Get exposure and earn even more royalties with TemplateCloud Boutiques!
So you have your own portfolio of designs selling on TemplateCloud. What if you could have your very own webshop to promote and sell your designs?
We’ll soon be launching TemplateCloud Boutiques as part of TemplateCloud.com. This will mean you’ll be able to create your own webshop to promote yourself and your TemplateCloud designs to the world. Everytime your design is ordered you’ll get 25% of the design fee you set.
We’re looking for a test group to get this started in BETA phase. So if you have a portfolio of designs and you want to be able to promote yourself with your own webshop register your interest on our Facebook page and we’ll be in touch.
10,000th TemplateCloud Design Goes Live!
TemplateCloud Design Library Reaches 10,000 Design Milestone

The TemplateCloud design library now has over 10,000 designs!
Congratulations to Paul Bullock who uploaded the 10,000th approved TemplateCloud design this week and won himself £100 for helping us to reach this new design milestone. You can take a look at Paul’s very festive winning design on the TemplateCloud website. Paul has been a Clouder from the very beginning and has over 100 designs selling via TemplateCloud’s partner retail sites.
Don’t forget you can still earn £5 in Advance Royalties for every design you upload. Read more about this here.
Happy designing!
Celebarate the 10,000th TemplateCloud Design and win £100!
Win £100 with TemplateCloud!

The TemplateCloud library is rapidly growing and we are fast approaching our 10,000th design upload! We currently have just over 9,900 approved designs and we want to celebrate this next landmark with you by giving £100 to the designer who uploads the 10,000th approved design addition to the TemplateCloud library.
Is you design already in the TemplateCloud design approval queue? If so you are in with a chance of winning £100 cash prize to be announced over the coming days. If not upload your latest design today to be in with a chance of winning.
Happy designing!
V Layer Design Tutorial
Practise Your V Layer Designing Techniques

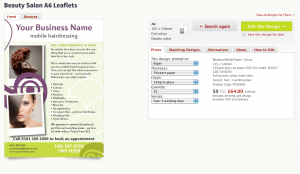
To help you get to grips with our V layer technology, we’ve put together a simple step-by-step tutorial for you to practise on. This tutorial will walk you through the necessary stages to build a single sided A5 leaflet designed for a podiatrist. This leaflet uses V layers to create both a circular image and has a second image which features a circle shape overlaying the image. You can see what the final layout for your tutorial design should look like to the left.
To get started, download the InDesign files for the tutorial here and follow the instructions below.
How does it work?
To create a V layer you need to create a mask (or masks) of the shape you want to use and place it on its own layer. ‘Ë?V’ stands for vector which means that anything on a V layer must be a vector object – you cannot use images, EPS files or other graphic elements on a V layer.
Before you attempt our V Layers Tutorial, make sure you have read this post on basic V Layer design rules.
STEP 1 – Punch out a shape
Firstly you need to make the shaped, circular image in the bottom right hand corner of the design. To do this:
 – Create a light grey rectangle the size of your A5 document.
– Create a circle shape at the size you wish the circular image to be (approximately 58mm in diameter).
– Place this over the rectangle at the point where you want the image to be displayed. Select both the rectangle and the circle and go to: Object > Pathfinder > Subtract in InDesign to ‘punch out’ the circle from your rectangle (below image).
– Create a new layer and call it ‘v_layer 1′ and place the rectangle shape on to it. Place the smaller foot image on its own layer called ‘Ë?Image 1′ and ensure it is below your new V layer.
– Put the 3 blue rectangle boxes for the text headers on to their own individual V layers (ie. ‘Ë?v_blue box 1 etc.). These should be above ‘v_layer 1′ in your layers palette and each text box will need to be above its V layer in the layer palette stacking order (see image to the right).
Don’t forget, only one element per editable layer.
STEP 2 – vector element over an image
Next you need to place a circular vector with text over an image. To do this:
 – Place the larger image with several feet at the top of your InDesign document so that it spans the full width. It should be on its own layer (eg. ‘Ë?Image 2′). Make sure you leave the white box behind it on the background, this acts as a white ‘canvas’ behind the image in case the client deletes it.
– Create a turquoise blue vector circle and put it onto a new V layer (eg. ‘v_layer 2′)
– Create a slightly smaller grey circle and position it on top of your turquoise circle. Again put it on its own individual V layer (eg. ‘v_layer 3′).
– Position the promotional text box above the two circles on its own layer (see image to the left). Consider using Copyfit to give end clients more editing flexibility.

STEP 3 – check, finalise & upload
Once you’ve positioned all images, text boxes and V layers as described, separate out the remaining elements onto layers and check the layers palette to ensure they are in the right order.
Remember:
- Images should be below V layers
- Relevant text boxes should be above V layers
- Anything that overlaps a V layer must be editable or placed on another V layer
If you want to use non-standard shapes (eg. rounded corners, stars etc.), you will need to draw these yourself as no InDesign Object Effect or Corner Effect options are allowed on a V layer. A white vector rectangle with rounded corners has already been provided in the tutorial InDesign file for you to place the placeholder logo on (don’t forget this will need to be a V layer as it is placed over another V layer in the layers palette).
This is how your final design should look at the ‘Try Template’ stage (see image to the right above).
Use the Final Checklist below before uploading your design. When you upload and build your design, name it using your name and ‘V Layer Test’ in the title so we know to remove your design from the Design Approval List.
V Layers Final Checklist:
- Label your layer as v_ (v_layer 1 for instance)
- Only use vector shapes on V layers
- Only one item per V layer
- You can have more than one V layer per design
- Position any images that are to be editable through your V Layer below the V layer
- Remember that V layers aren’t editable by the end user
TemplateCloud Advance Royalties
We’ll pay £500 each month for your designs!

TemplateCloud is an online marketplace where graphic designers – like you – can upload designs and earn unlimited royalties. You create designs for Flyers, Leaflets, Business Cards, Stationery, that kind of thing, then we turn them into editable templates for sale online.
We’re unique.
We sell your design templates via different websites across the world. Each time a customer uses your design, we pay you a royalty. We’ll also prepay you £5 each submission for up to 100 designs each month- that’s guaranteed.
Getting started is easy, you just need Adobe InDesign and an internet connection, then just get creative.
If you need help with resources, you can even use Fotolia images. Just choose from millions of images in the image library and use them in your designs – for free! Read this article for more information.
So what are you waiting for? Visit TemplateCloud.com and start earning a guaranteed income for your designs.
Happy Designing
Terms and Conditions:
-
1. One account per contributor.
- 2. TemplateCloud reserve the right to withdraw this offer at any time.
- 3. Payments can only be made directly into bank account provided.
- 4. All sales Royalties earned from the sale of designs pursuant to the template supply agreement will be offset against the total Advanced Template Royalties paid.
- 5. You may not terminate the template supply agreement until Template Royalties in respect of each design supplied pursuant to this promotion exceed the advance payment.
- 6. Offer limited to a maximum of 100 designs per contributor, per month, approved and accepted by us at our discretion.


